CANx app configurator manual
Project configuration
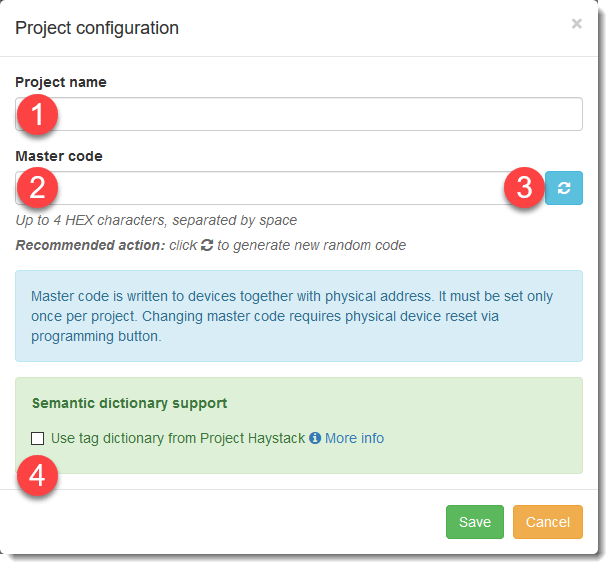
1 - Project name.
2 - Master code - Master code is written to devices together with physical address. It must be set only once per project. Changing master code requires physical device reset via programming button.
3 - Generate random master code.
4 - Enable Project Haystack semantics dictionary. Allow of use pre-defined tag dictionary for common definition of objects and devices.
Groups
Group view is split in to 4 sections.
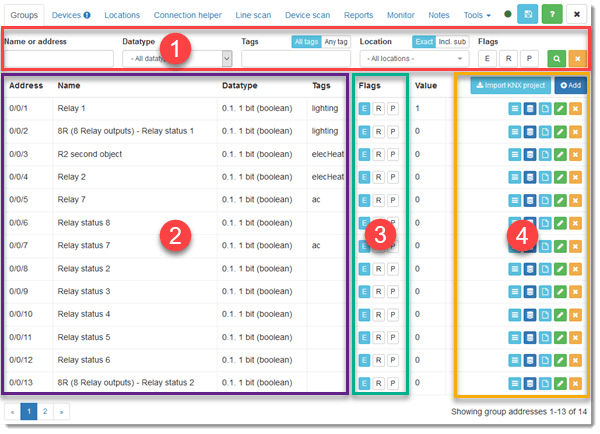
1 - Filter objects by name, datatype, tag and location.
2 - List of groups.
3 - Group properties.
4 - Actions and editing.
Filter

1 - By name or part of the name.
2 - By datatype.
3 - By single or several tags. All tags or any tag can be selected.
4 - By location, Exact will display only groups in selected location. Inc. sub will display all groups belonging to this location and all locations associated to all levels below selected location.
5 - By group flags.
List of groups
Groups are presented as a list on several pages if needed. Groups contain Address, Name, Datatype and Tag.
Properties

1 - Export - group will be exported to Logic Machine object and all bus telegrams will be synchronized between CANx and Logic Machine objects.
2 - Read on init - Group will be read on initialization
3 - Post process - Custom event script
Actions and editing
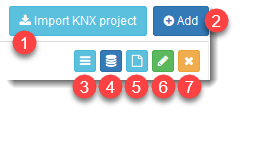
1 - Import KNX project - KNX ETS project can be imported in JSON format. Project has to be converted here.
2 - Add new group address.
3 - List of devices - list of all devices which uses selected group.
4 - Read/write value - Ability to read and write values to the group.
5 - Edit script - open post process script tool
6 - Edit - Already existing group can be edited.
7 - Delete - Will delete group and all associated mappings to device objects
Add new group address

1 - Group address - First unused address is added automatically. Available range is 0/0/1 - 31/7/255.
2 - Name - Name of group.
3 - Datatype - following datatypes are supported:
- 0.1 1bit (boolean)
- 1.1 1 byte unsigned integer
- 1.2 1 byte signed integer
- 2.1 2 byte unsigned integer
- 2.2 2 byte signed integer
- 4.1 4 byte unsigned integer
- 4.2 4 byte signed integer
- 4.3 4 byte floating point
- 4.4 4 byte timestamp
- 8.1 8 byte unsigned integer
- 8.2 8 byte signed integer
- 8.3 8 byte floating point
4 - Tags - Can be selected from the Project Haystack or added custom specific.
5 - Location - Group can be associated to location which has to be first created under Location tab.
6 - Properties
7- Comments - Group comments.
Edit script
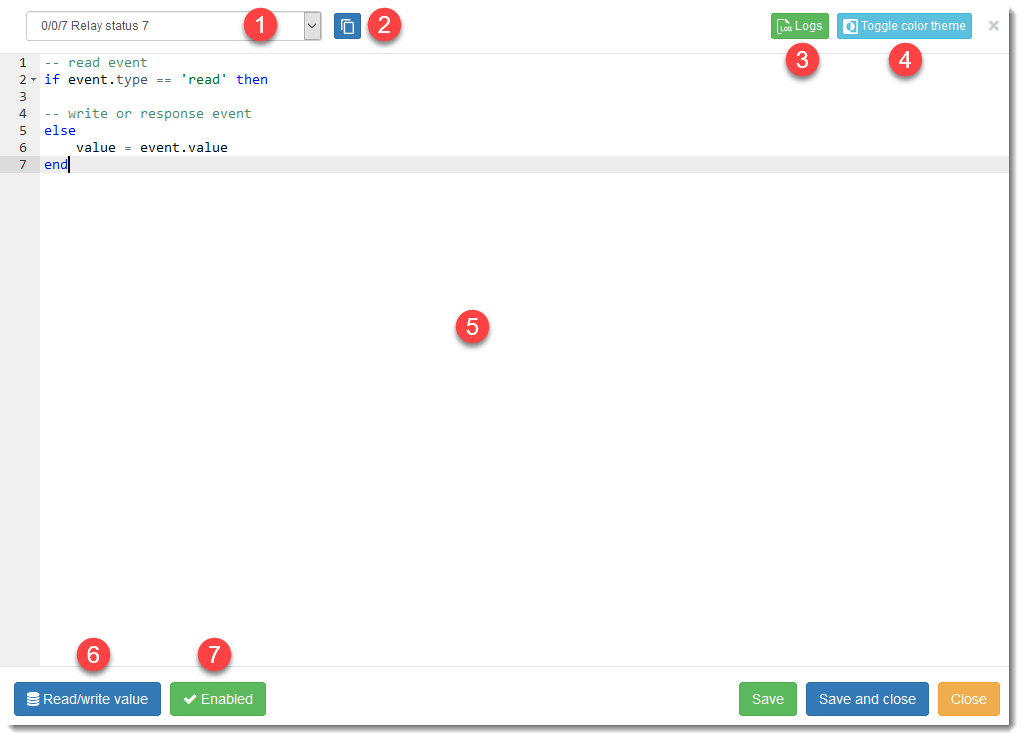
1- Group selection
2 - Open script editor i new window
3 - Open/close logs window
4 - Toggle black/white theme
5 - Scripting window
6 - Allow to read/write selected group
7 - Enable/disable the script - Equivalent to the post process group flag.
CANx functions
Following functions are supported by CANx:
canx.find(groupaddress)
Return database entry (Lua table) for the given group address
canx.getvalue(groupaddress)
Return value of the given group address
canx.read(alias)
Send read telegram to the give alias (either group address or direct object id)
canx.write(alias, value, datatype)
Send write telegram to the give alias (either group address or direct object id) Datatype is required when writing directly to object id or when group address data type is not set in the database
canx.response(alias, value, datatype)
Send response telegram to the give alias (either group address or direct object id) Datatype is required when writing directly to object id or when group address data type is not set in the database
Devices
Device view is split in to 4 sections.
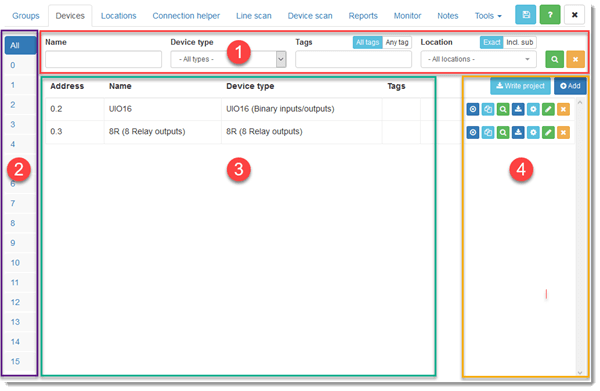
1 - Filter devices by name, device type, tag and location.
2 - CANx line selection.
3 - List of devices
4 - Actions and editing.
Actions and editing
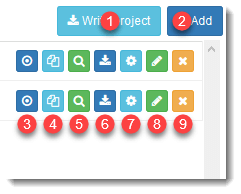
1 - Write project - download all configuration to all new or modified devices. Project can be written to all devices or to selected devices by filter. To only modified devices or all devices.
2 - Add - new device can be added.
3 - Check device - perform check of existence of the device on the line.
4 - Duplicate device - duplicate a device with its configuration parameters.
5 - Device scan - perform scan of device, view will jump to Device scan
6 - Write device - download only selected device configuration.
7 - Configure - open window with device configuration.
8 - Edit device - system device parameters can be edited
9 - Delete device from project
Write project

Project can be written to devices with selection by Device list where whole project or matching current filter can be selected. Selection via device status allows to select only modified devices or all devices.
Add new device
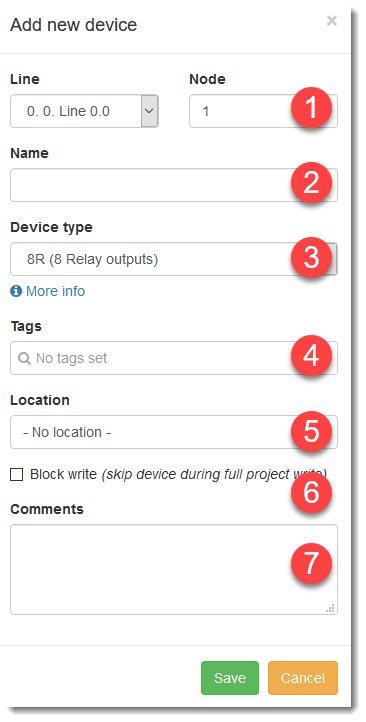
1 - device address selection
2 - device name
3 - device type
4 - Tag
5 - Location
6 - Block write - will skip device during full project write
7 - Comments
Device configuration
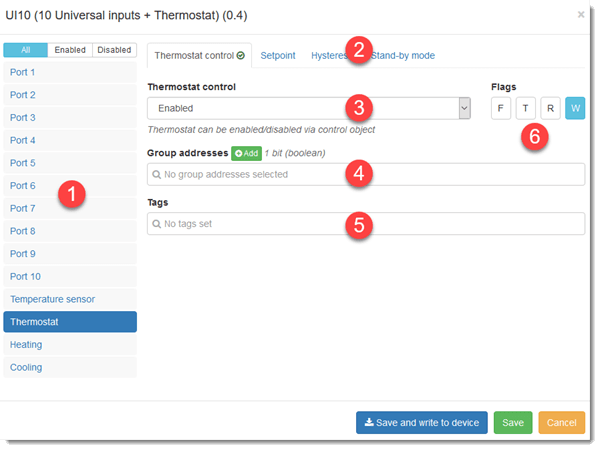
1 - Port selection, by default all ports are disabled
2 - Port object selection by separate tabs.
3 - Object properties selection
4 - Group address selection for a given object.
5 - Group tag selection
6 - Object flags:
- Filter
- Transmit
- Read
- Write
Locations
Locations view is split in to 4 sections.
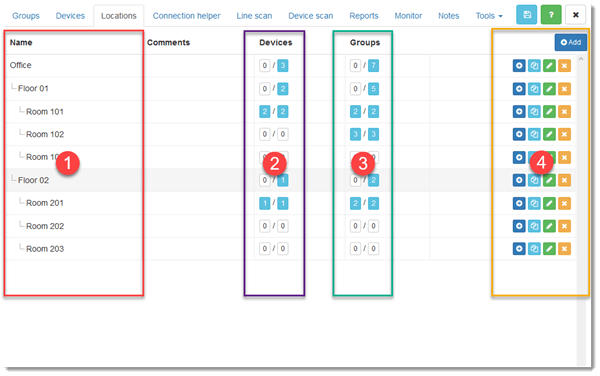
1 - Name - tree view of the locations
2 - Device - number of devices associated with particular location. Selection of specific number will navigate to Device tab with already selected location filter.
3 - Groups - Number of groups associated with particular location. Selection of specific number will navigate to Groups tab with already selected location filter.
4 - Action buttons
Action buttons
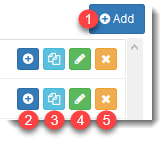
1 - Add - add new location with ability to select its parent location.
2 - Add location under selected parent location
3 - Duplicate selected location with any sub locations.
4 - Edit location
5 - Delete location with all sub locations.
Duplicate location
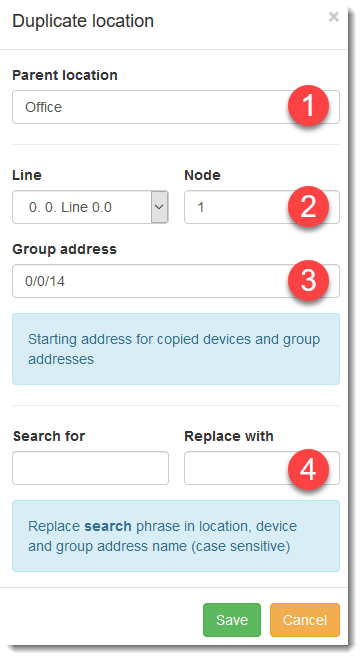
Duplicate locations allows of copy of all associated groups and devices to particular location and paste with new addresses and names.
1 - Parent location
2 - Starting address for copied devices
3 - Starting address of copied groups
4 - Replace search phrase in location, device and group addresses name (case sensitive)
Connection helper
Connection helper helps making group connection with objects based on selected filter. Selected filter will display any configured unassociated or all objects. Selected Actuator object and selected Sensor object can be saved and group address will be created.
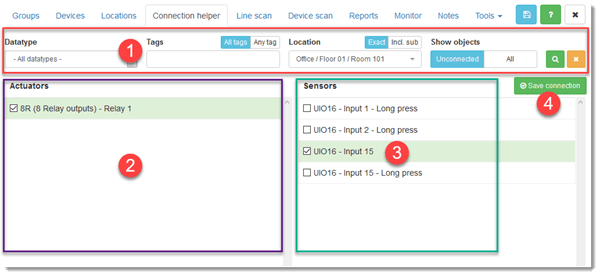
1 - Filter by datatype, tag and location. Objects can be filtered be by unassociated objects or all.
2 - All filtered Actuator type objects
3 - All filtered Sensor type objects
4 - Save selected connection.
Line scan
Line scan will scan network for all connected devices. Line scan view is split in to 3 sections.
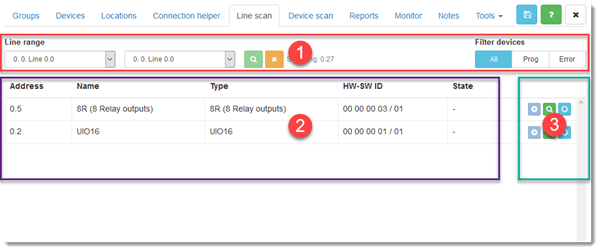
1 - Scan parameters.
2 - List of discovered devices
3 - Action buttons
Scan parameters

1 - Line scan range
2 - Start scan
3 - Stop running scan
4 - Scan status
5 - Filter discovered devices by:
- All
- Devices in programming mode
- Devices with error
List of discovered devices

1 - Address
2 - Name
3 - Device type
4 - Hardware and software ID
5 - Device state
Action buttons
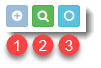
1 - Add device to database
2 - Scan selected device. Will open Device scan tab.
3 - Flash LED of selected device for easy identification.
Device scan
Device scan will find all objects, its parameters and associated groups from selected device. Device scan view is split in to 3 sections.
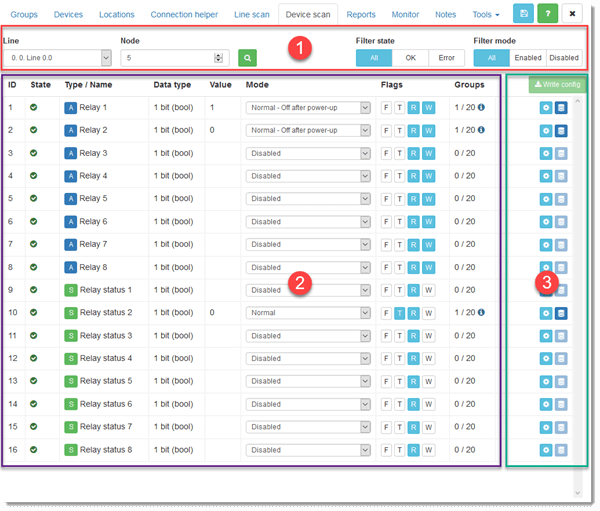
1 - Scan parameters.
2 - List of discovered objects
3 - Action buttons
Scan parameters

1 - Scanned device address
2 - Start scan
3 - Filter state - scanned objects can be filtered by its state where:
- All - display all objects
- OK - display objects with OK state
- Error - display objects with error only
Filter mode - filter objects by its mode where:
- All - display all objects
- Enabled - display only enabled objects
- Disabled - display only disabled objects
List of discovered objects
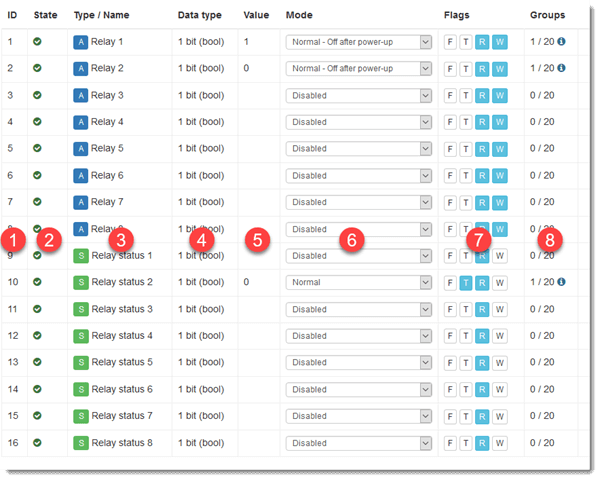
1 - Object ID
2 - Object status
3 - Object types and names where:
- A - actuator
- S - sensor
4 - Object data type
5 - Last scanned value
6 - Object mode
7 - Object flags:
- Filter
- Transmit
- Read
- Write
8 - number of association groups
Action buttons
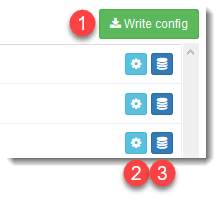
1 - Write config - write changed configuration to the device
2 - Configure object - Object mode, flags and group associations can be changed
3 - Set value - Ability to write value to object. Note! this is not writing to group address only direct device object write.
Report
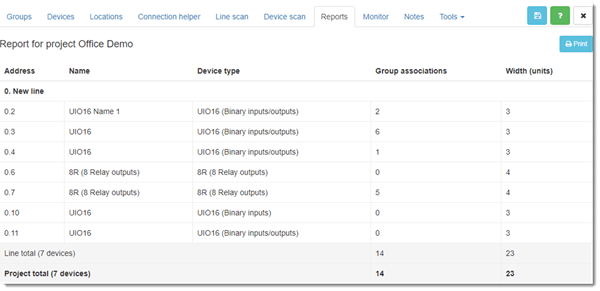
Reports section lists all devices in the project indicating which devices are located in which line, how many group addresses are associated with a particular device, how much space it is required in the cabinet.
Monitor
The tool allows to monitor and send any bus telegrams.
Monitor view is split in to 4 sections.
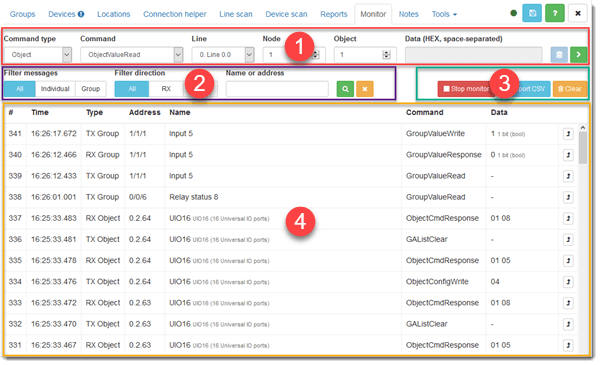
1 - Commands - allows of sending any type of command to the bus
2 - Filter - monitored telegrams can be filtered by message type, directions and name or address.
3 - Action buttons
4 - List of monitored telegrams.
Commands


1 - Command type - CANx allows of two types of communication, direct and by groups. When direct communication is used then addressing is done by physical location of device(node) and object ID. when group communication is used then group addressing has to be used.There are 4 types of commands:
- Object commands
- Device commands
- Group commands
- Control commands
2 - Command - select desired command.
3 - Group address - select desired group, visible only when group type communication
4 - Data - command date when needed, see description above.
5 - Set value - allow to select object/group value
6 - Send command - will send command to bus if all parameters are correct, otherwise error will be displayed.
7 - Line - line of the device physical location
8 - Node - device line address
9 - Object - ID of device object
Filter
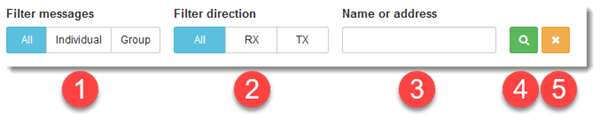
1 - Filter message - allow to filter by All, individual or group communication.
2 - Filter direction - Allow to filter all, sent or received telegrams.
3 - Name or address - filter by group name or address. Depend of type of communication address can be in format off group address 1/1/1 or location address 1.1.1. There is also possibility for range search by using * .
4 - Apply filter
5 - Cancel filter
Action buttons
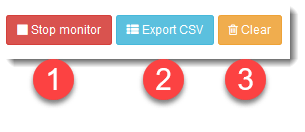
1 - Start/Stop monitoring
2 - Export CSV - allow export of monitored telegrams to CSV file
3 - Clear - clears monitored telegrams
List of monitored telegrams
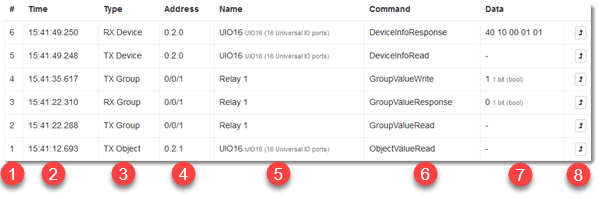
1 - Record ID
2 - Time of record
3 - Type of communication
4 - Address of device or group
5 - Name of device or group
6 - Command
7 - Data sent or received
8 - Ability to select telegram and re-send it by the command tool.
Notes
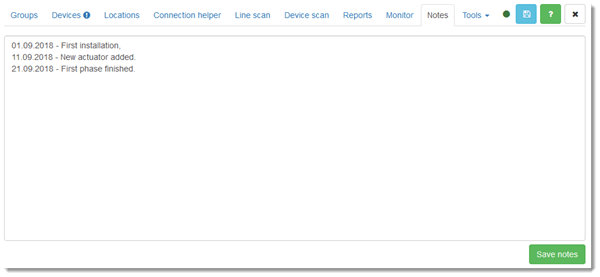
Dedicated place for project notes which will be kept in database.
Tools
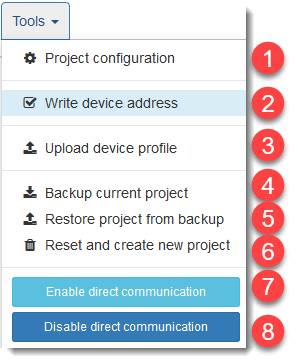
1 - Project configuration - Edit project configuration which is automatically opened on the begining of new project
2 - Write device address - Devices readdressing procedure is started here
3 - Upload device profile - New device profile can be uploaded
4 - Backup current project
5 - Restore project from backup
6 - Reset and create new project
7 - Enable direct communication - once enabled only group communication will be possible. Modification of device configuration will be blocked.
8 - Disable direct communication.